C-Band TV Installation
Basics
An Overview Of Installation Techniques,
Tips and Frequently Asked Questions
Prepared By J. Cornwall, General Instrument Corp.
In Cooperation With DSI-CSS
- Getting Started - The Site Survey
- Use A Written Installation Agreement
- Planting The Dish
- Dish Assembly
- Mounting The Feedhorn
- A Word About Focal Depth
- Feedhorn Issues
- Low Noise Block Amplifiers - The LNB
- The Actuator Arm - The Dish Mover
- Aligning The Dish
- Last Step - Installing The 4DTV IRD
Getting Started - The Site Survey
The Site Survey is the first step in a good installation. The purpose of the site survey is to assure that several conditions are met that will insure the proper operation of the C-Band TV system. The conditions you are examining are;
Is there and unobstructed view to all of the satellite positions?
Will seasonal foliage cause problems?
Is the area that the dish is to be anchored in solid?
Is the area aesthetically acceptable to the purchaser?
Are there sources of terrestrial interference that need to be considered?
Use of a precision tool like the Gourmet Entertaining Sat-Site will expedite your site survey. Make sure to invite your client to help with the survey. Allow the client to use the Sat-Site and find an acceptable location - this always helps to build excitement and eliminate misunderstanding.
You must verify that there are no transmissions in the 3.7 to 4.2 GHz frequency band that will cause problems with reception. An easy way to verify this is to use a good LNB, connected to a signal strength meter and no dish. Sweep the LNB around the target area in a full circle. If the LNB picks up spikes of signal it is safe to assume those same spikes may cause interference in the finished installation. Call your local phone company's engineering department to verify there are no transmitting towers in the target area.
![]()
Use A Written Installation Agreement
This can't be stressed strongly enough. Use a written agreement to verify pricing, location and costs before you begin work. An agreement, signed by both the contractor and the client will help to alleviate future problems and assure that all parties understand exactly what the terms, conditions and issues pertaining to the installation are. This is a good practice for both the dealer and the consumer ñ it avoids miscommunications.
![]()
A properly installed dish requires a perfectly plumb, well anchored solid base. A good idea is to fill the pole with concrete as well as pouring a concrete base, this will further strengthen and stiffen the installation allowing for more accurate reception of C and Ku band signals.
|
|
|
|
|
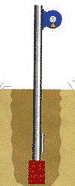
A good "rule of thumb" is to use one bag of concrete for each full foot
of dish size. A seven and one half foot dish should have seven bags of concrete as
an anchor for a minimum. More is a good idea if you are in a region where strong
storms are common.
![]()
Every dish sold comes with directions for assembly. Make sure you read the instructions before attempting to assemble the dish! Some important things to remember;
- The dish needs to be perfectly shaped. Use a measuring tape and measure across the diameter of the dish in three directions. All measurements should be identical.
- Tie a piece of string across the diameter of the dish in two directions. The strings should just barely touch at the center of the dish. If the strings are pushed hard against each other or fail to touch then the dish is not properly assembled.
- Don't over tighten the dish mounting hardware. You do not want the ribs to be deformed by pressure as this will prevent proper alignment. Allow the lock washers to perform the job of securing the bolts.
![]()
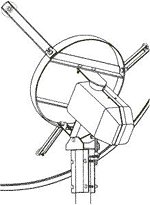
Contrary to popular belief, the dish is not the antenna. It is a reflector that focuses the energy into a small golf-ball sized orb at the mouth of the feedhorn. Inside the feedhorn is a small probe that is turned by the servo motor to select vertical or horizontal polarity. This probe is the actual antenna. Knowing this will allow you to see how important it is to properly mount the feedhorn.
Do not assume, as so many do, that because all the supports holding the scalar ring are the same length that centering is automatic. You need to assure that the scalar ring (the supporting ring for the feedhorn) is parallel to the bottom of the dish and that it is perfectly centered in the dish. Failure to assure this step will cause imperfect reception. Having the focal point of by as little as one half of one inch can cause a fifty percent loss in signal strength!
Measure from the edge of the dish to the scalar ring in at least three directions to assure that it is centered. Each measurement should be within 1/32 inch of the other measurements. Accuracy here will reward you with better performance later.
![]()
The f/D ratio is the focal distance of the dish (f), divided by the diameter (D). When dealing with most prime focus antennas, the number should come out between .28 and .42. If you notice, most of those numbers are also on scale on the side of the feedhorn. You simply set the top edge of the scalar ring even with the line that corresponds to your correct f/D setting. What this adjustment actually does is determines how wide of an angle the feedhorn can "see".
To calculate the focal distance, you have to measure the diameter (D) and the depth (d) of the dish. Measurements should be in like units (you can't use feet for the diameter and inches for depth). For the example, let's say we have a dish that is 120 inches in diameter (D) and 18 inches deep (d). Focal distance (f) equals the diameter squared (D x D) divided by 16 times the depth (16 x d) or :
D x D = 120 x 120 = 14400
16 x d = 16 x 18 = 288
D x D/16 x d = 14400/288 = 50
Therefore focal distance f = 50 inches
After you have calculated the focal distance (f), you can use that figure to calculate the f/D ratio of your dish. In this case, using the same diameter of (D) = 120; and the calculated focal distance (f) = 50
f / D = 50 / 120 = .416
f /D = .416
You would round up to give a setting of .42.
All of this information will be provided in the dish manufacturers instructions so it is important to read the directions and understand the type of equipment you are working with. Often times you will be working on a system that was previously installed. Knowing how to calculate these settings will make troubleshooting and setting up an unfamiliar dish much easier.
![]()
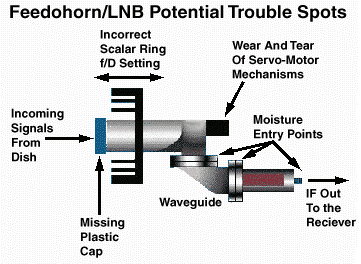
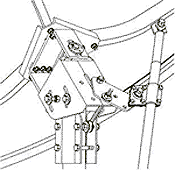
Moisture is the enemy of microwave reception so making sure the feedhorn and LNB's are protected and properly installed is very important to long-term service free performance of a C-Band TV system.
Make sure that all coaxial cable connections are crimped with a proper tool and treated to prevent moisture from entering the cable. Make sure you use the gaskets supplied with the LNB's to prevent moisture from entering the throat of the feedhorn. Also, check to be sure the plastic covering for the throat of the feedhorn is attached firmly to prevent both moisture and pests from entering the waveguide.
The diagram below will point out some sensitive areas you need to check to assure best performance.
|
|
![]()
Low Noise Block Amplifiers - The LNB
The LNB is the electronic device that mounts on the feedhorn and converts that golf ball sized globe of RF energy into an electrical signal the IRD (receiver) can understand and use. There are several kinds of LNB. There are LNBF's which use voltage on the coaxial cable to switch from vertical to horizontal polarity. There are consumer grade LNB's that use an external servo motor to turn the probe and select polarity. Last there are Digital or PLL (Phase Locked Loop) LNB's that are normally used on commercial installations. It is highly recommended that a PLL LNB be used on any high-quality TVRO installation whether consumer or commercial.
The biggest difference between a normal LNB and a PLL LNB is the amount of frequency drift. The following charts from CalAmp show the difference in drift between and consumer and commercial PLL LNB.
![]()
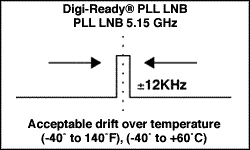
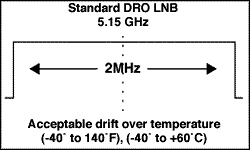
No matter the type of LNB, don't get caught up in a numbers war. Many beginning installer think that a lower temperature LNB will always be better than a higher temperature LNB. This is not necessarily true. A PLL 25 degree LNB will almost always outperform a 17 degree consumer (standard grade) LNB.
Also, you cannot make up for poor dish alignment or installation with a better LNB or line amplifier. The dish needs to collect the signal and send it cleanly to the throat of the feedhorn. All the electronics in the world cannot help the picture if you are losing half your signal and sending loads of noise into the feedhorn. Use a good LNB, preferably a PLL LNB - but spend your time making sure the mechanics of the dish are up to snuff first.
![]()
The Actuator Arm (The Dish Mover)
Now that we have the proper LNB mounted on the feedhorn, the feedhorn mounted on the dish and centered exactly, and the dish mounted on a plumb and properly secure pole we are ready to connect the actuator arm. Make sure you use an actuator that is properly rated for the dish it is attached to. You should never use an 18" actuator arm to try and move a solid twelve foot dish! It may work for a while but the chances are good that you will be replacing it in short order. Try to get the best heavy duty actuator arm you can - it will pay for itself many times over in years of trouble free service.
There are two types of actuator, the horizon-to-horizon mount which allows 180 degrees of uninterrupted travel and the linear actuator. The linear arm is far and away the most common and will work just fine in almost all domestic installations. If you have a desire to view some of the programming on the AOR (Atlantic Ocean Region) international satellites or the corresponding Pacific Region birds then by all means try to get a horizon-to-horizon mount.
 |
|
|
Rear view of a typical |
|
 |
|
|
Rear view of a typical |
|
![]()
A common error made by both new installers and old timers alike is in attaching the linear actuator arm. East of the Mississippi we use a Linear West setting. This seems counter-intuitive at first but closer examination will reveal the sense of this set-up. We want the actuator arm to push the dish into position and let gravity help to return it. From the eastern part of the country the lowest satellites will be on the western side of the arc so we position the actuator arm on the west side of the dish (on the right when looking at the dish from behind). From the western part of the country the situation is reversed and the lowest satellites will be the eastern birds. West of the Mississippi we attach the actuator arm to the left of the dish and call it a linear east mount.
Correct choice of linear east or west will increase the useful life of the actuator arm. More importantly, on very sophisticated IRD's like the General Instruments 4DTV, the receiver actually uses the pulses from the reed sensor switch to predict where a satellite should be. Misidentifying the type of actuator (calling it linear east when it is, in fact, linear west) is the most common problem in using an auto-installation feature like the one on the 4DTV.
![]()
Now we come to the hardest part of the installation, but if we do our job well and pay attention in the preceding procedures this will go a lot quicker. The use of a specialized tool like the Gourmet Entertaining Arc-Set is highly recommended for best results.
First you need to calculate the declination figure for the exact area where you are setting up the dish. Declination angles are extremely important and need to be precise within one-tenth of one degree for good tracing of the satellite arc, especially for Ku reception. Remember, we are going to be capturing the signals sent out by a satellite that is operating with about the same amount of power as a strong camp lantern, yet it is 23,500 miles away in space! Attention to detail is the key. Once the declination offset is adjusted it is not touched again, all "tweaking" should be done with the polar axis and the elevation adjustment.
Determine the latitude of your installation by using a map and then use one of the many declination tables available on the Internet. Chaparral has an excellent document detailing the set-up on their info-fax system. Once you know the latitude of your installation site and the declination angle you can determine the declination setting mathematically. (Gourmet Entertaining makes all these calculations for you on the excellent Arc-Set. Call 213-666-2728 for more information).
Once the declination is properly set the procedure is to set the dish to true south (not magnetic south, you need to compensate) and use the elevation adjustment to capture the southernmost satellite visible from your location. This is called the zenith satellite. Once you are peaked at the southernmost satellite you use the actuator control on the receiver to move the dish to the lowest satellite off the horizon you can see. This is called the extreme satellite.
Once you have located the extreme satellite gently push up and down on the edge of the dish to see which direction helps clear up the picture. If pushing down on the lip of the dish clears up the picture then you need to rotate the polar mount counterclockwise. If pushing up on the lip of the dish clears up the picture then you need to rotate the polar mount clockwise on the pole.
After you have made the azimuth adjustment you then return the dish to the southernmost satellite and use the elevation adjustment to clear the picture up. Keep bouncing back and forth between the extreme satellite and the zenith satellite using the polar adjustment and the elevation adjustment respectively until the dish tracks the arc. The attached sheet "Tracking Problems" will graphically show you the root cause of poor performance.
![]()
The following instructions are based on installing a 4DTV IRD into an existing system. The only difference between a new system and an upgrade is the need to align the dish (above) and set the physical limits of the actuator. Other than that all directions are very similar.
| 1) Before disconnecting old unit, position the dish to G9-7. Connect power
and dish cables to the new unit. 2) Press <Options 6 4 2> Select actuator and LNB type. Select "standard" feedhorn. 3) Press <go back> 4) Press<3> to get to the east/west limits screen. Press <3> to get to the Program Satellites screen. You may begin programming satellites w/o programming limits. You may then go back and put the limits in once you know where the satellites are. WARNING: Programming satellites without setting the limits may cause damage to the dish, actuator, roof, etc. if your system does not have limit settings properly set at the dish. 6) By using the arrow keys position the yellow cursor over the G9 tile. Press <enter>. 7) This is the Satellite Adjustment screen. Channel up to "target" channel of the program you intend to find to identify the satellite you are on. (Channel 3 is a analog clear, easily identifiable channel) 8) Press <2> for dish position control. 9) Use east or west arrows to move the dish until you locate the desired signal. The dish should already be on G9 if it was left at the position before installation. If unable to locate G9 and only finding opposite format satellites, you must switch the feedhorn setting to rotated 90' in step #2 and begin again. 10) Once you have found the correct "target" channel on the selected satellite, adjust the dish position to maximize quality. 11) Press <4> for Skew Adjust. Adjust the skew to maximize quality. You may choose to use the auto skew feature by pressing <5>. You need to peak skew on both an odd channel and an even channel. The skew settings should be 90 degrees apart (if odd is -30 then even should be +60 for example). 12) Press <go back>and <enter> to save settings. This will put you back on the satellite chart to select the next bird to be programmed in. Do NOT continue yet. Press <view>. Change channel to 7. 13) Press <option>. At the bottom of the screen you should notice the number in the box marked "Channels" increasing. Once the unit has stopped counting (currently there are about 2600 channels) it has completed downloading the channel maps. 14) While you are on G9-7, take a moment to call a 4DTV ready Program Provider to get the IPG authorized. They will need the Digital UA# in order to authorize. This # can be found on the same system status screen on line # A. Hit options, then 6, then 5 and read the numbers next to A. 15) Resume programming satellites by pressing <option> and <3>. Select the next satellite until you have programmed the satellites that you desire. We recommend manually programming at least 3 satellites in the middle of the arc and the furthest East and West satellite. After you have done this you can begin using the auto dish positioner. Press<1> instead of <2> as listed in Step 8. This forces the unit to automatically calculate the location of your selection and move the dish for you to its "best guess". 16) When programming the "fringe" satellites or the farthest East/West, make a note to yourself of the dish position. This will allow you to set the limits effortlessly. After installing the satellites press <Go Back> until you come back to the East/West Limit screen. Press <1> to select E limit. Using E/W arrows change the numbers to those that you have noted for the E limit. Press <2> for W limit and do the same thing. Simply set the limits to a few counts above or below the satellite locations for C1 and G6. Press <view> to exit screen. *Special Steps Pertaining to Acquisition of Digital Channels:* 17) Some additional skew adjustments may be necessary to receive digital signals as they are more sensitive to cross polarization. This can be achieved by going to the satellite needing adjustment. Tune to either the 'home' channel or the 'virtual' channel. Press <options 6 4 4> The highlight should be over the current satellite location. Press <enter>. 18) You will notice at the bottom of the screen a box unique to digital channels labeled "Quality". This number must be at least 25 to receive digital video. Play with <2> dish position and <4> skew in small increments to achieve the highest quality. Channel to the opposite polarity if applicable and repeat. Press <go back> and <enter> to save. The opposite polarity on a digital channel is not always the next channel in series, it may be several digital virtual channels higher or lower before the polarities change. The installation is complete. 4DTV, DigiCipher, DigiCipher II, and DigiCipher II Plus are registered trademarks of General Instrument All other product and service names are trademarks of their respective manufacturers or providers. |